
Vyshnavhee Gurunathan · 1st September 2023
How to create a Salesforce sandbox
Salesforce professionals can feel like they’re living in a Catch 22: developing and testing in production risks disrupting your live environment, but developer orgs aren’t an accurate representation of how changes may actually affect production. It can feel like a lose-lose situation!
Sandboxes fill this gap — they can accurately mirror your production org without the risks of developing in your live environment. But while many teams use some form of sandbox, most aren’t getting the full value out of this opportunity because they aren’t choosing the right type or managing them as well as they could. If you want to supercharge your development process, read on for everything you need to know about Salesforce sandboxes.
What is a Salesforce sandbox?
Testing new features can be tricky and uncertain, so you don’t want to risk affecting your users by making direct changes into your production environment. That’s where sandboxes come in. A Salesforce sandbox is a copy of your production org with all of the same metadata.
It’s a completely isolated and separate environment, so anything you do in your sandbox won’t affect your development work. You can use your sandbox environment to test any changes you’ve made based on your production data, to test any new Salesforce releases, and as a training environment — without worrying about damaging production.
Choosing the right sandbox
Salesforce provides a variety of sandbox types for different use cases, and it’s important to use the right sandbox for your task. We’ll run through the four sandbox types shortly, but there are two key considerations to help you choose.
How frequently do you need to refresh your sandbox?
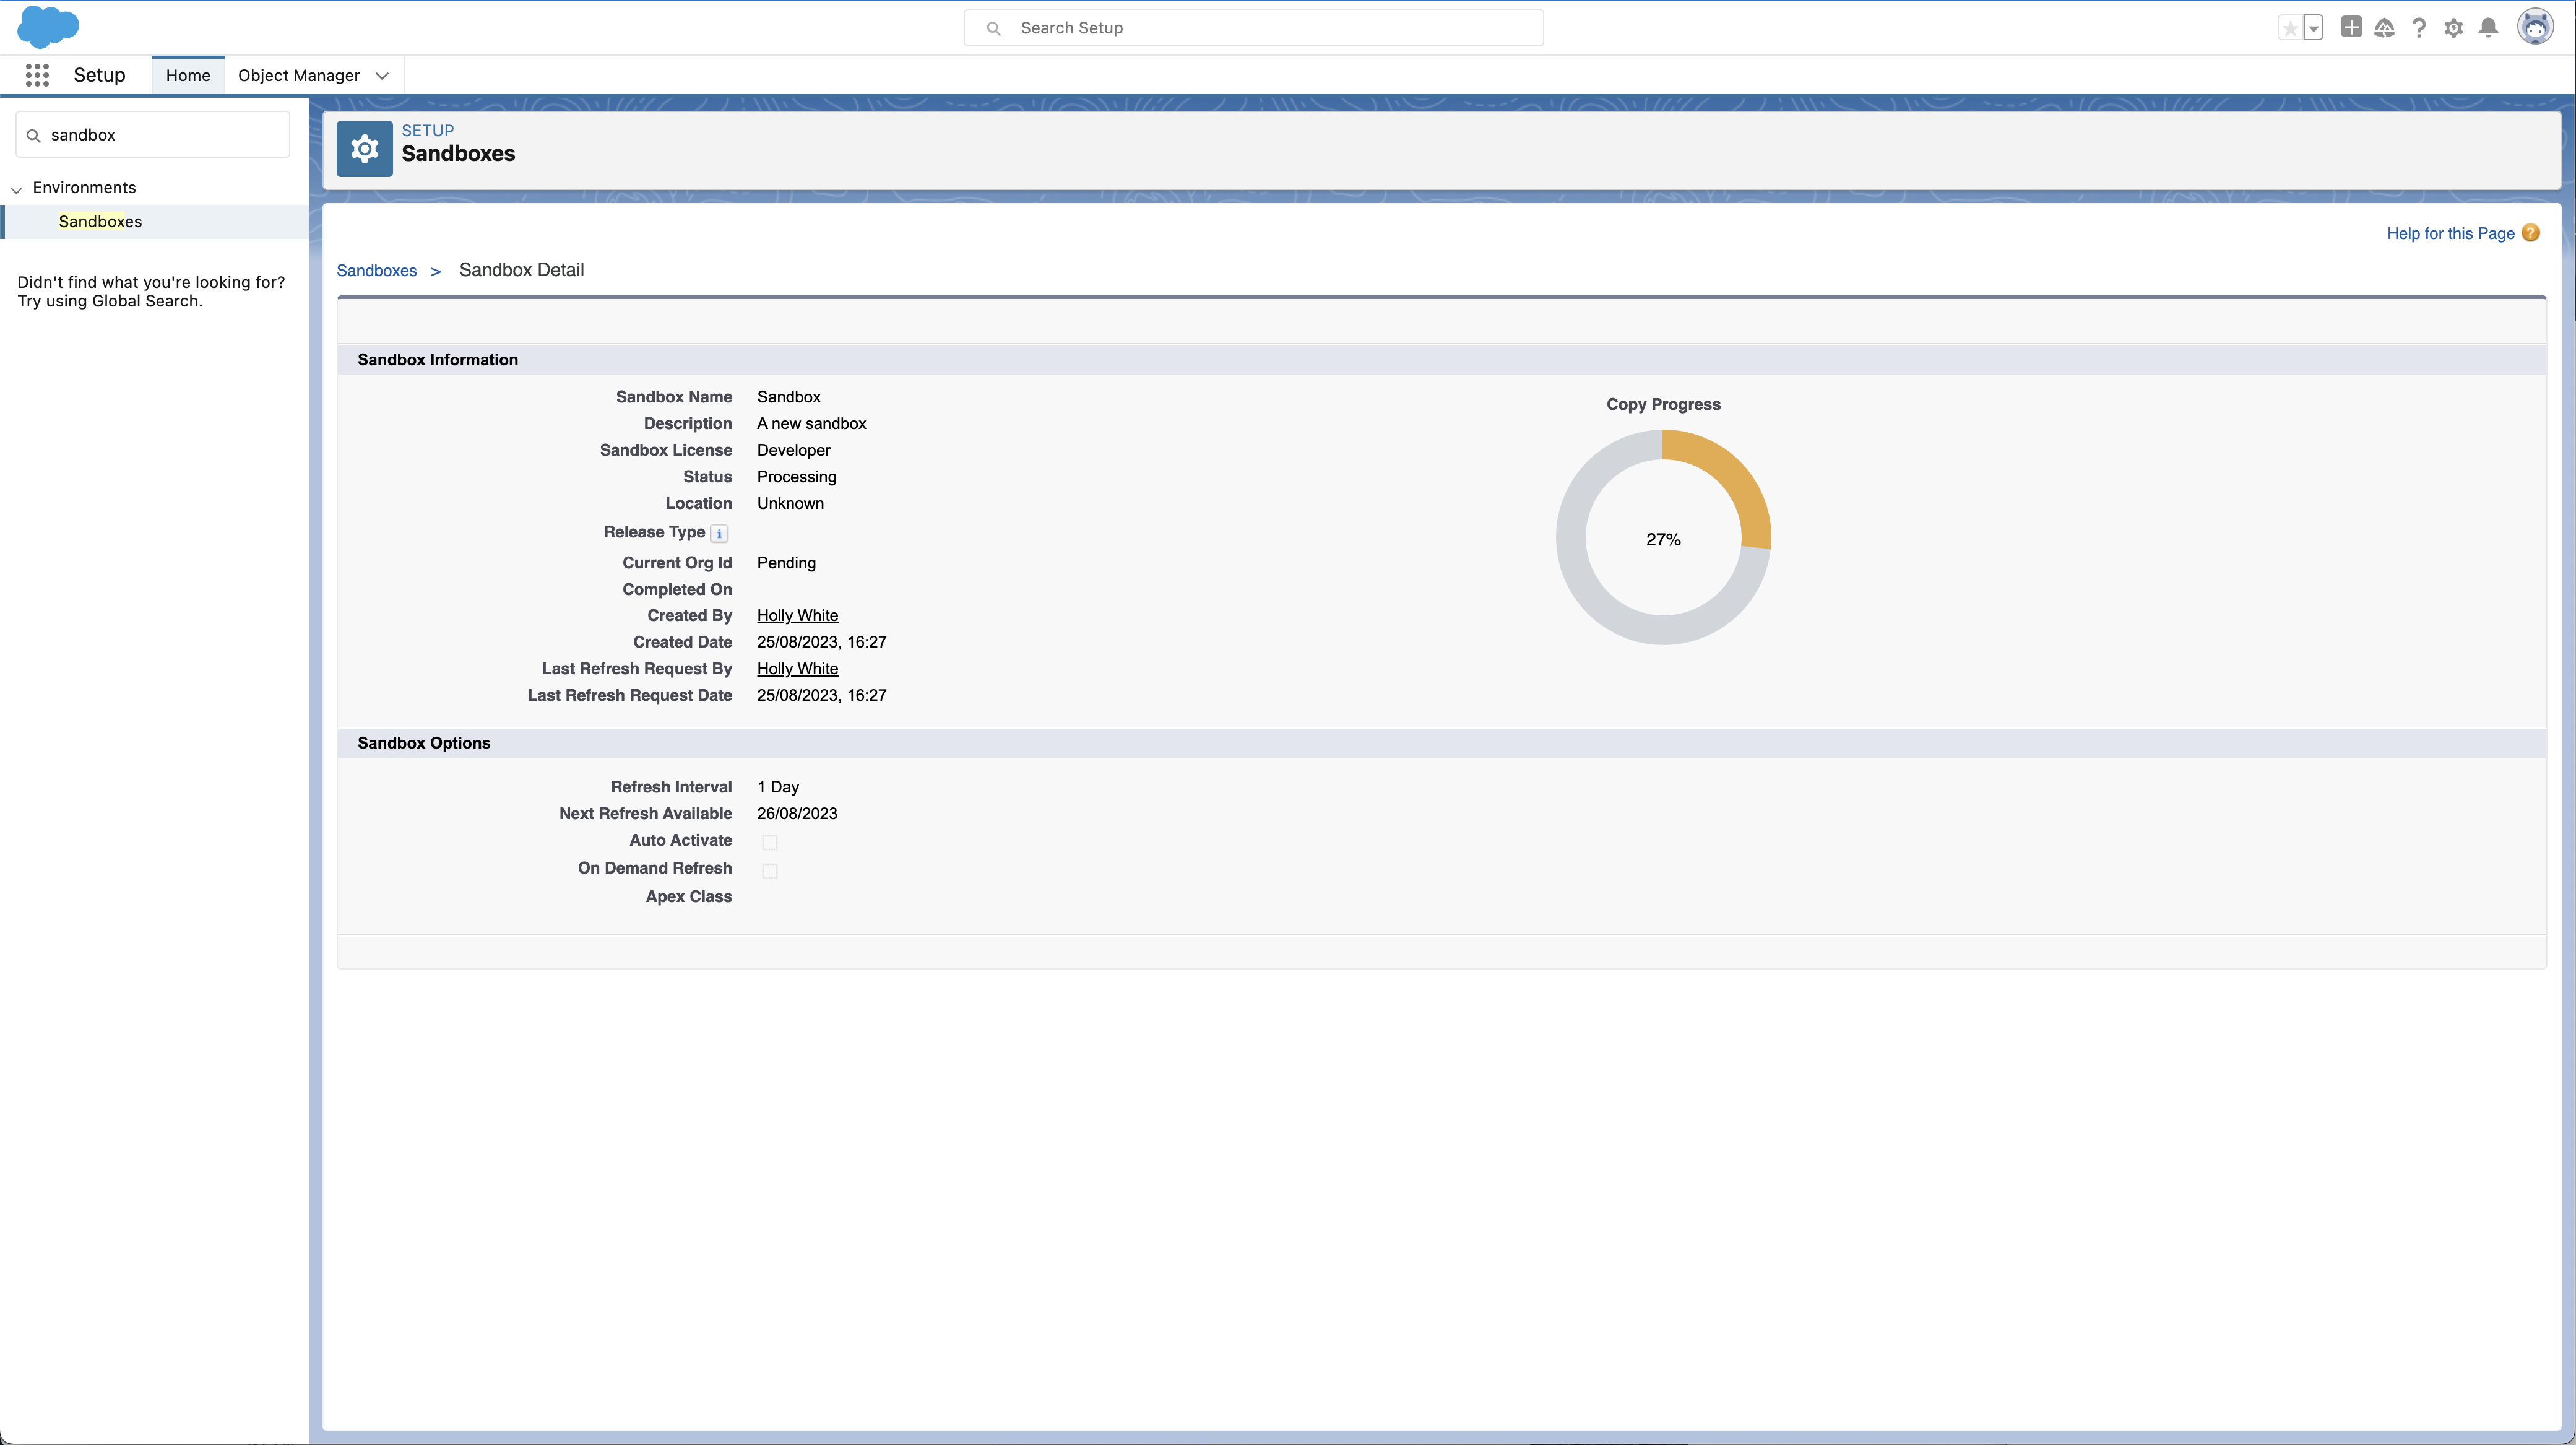
A sandbox is a representation of your production org at the moment in time when you created it, so you’ll need to “refresh” your sandbox to update its contents with new data and metadata from production. You can refresh your sandbox by going to Setup > Data Management > Sandboxes. Here, all your sandboxes will have a refresh link next to them. Click Refresh, which will change the status to Copying, and you’ll get an email when the refresh is complete.
Different sandbox types vary in their “refresh interval”, which is the period of time you must wait between sandbox refreshes. The more frequently you’re deploying changes, the more frequently you’ll want to test them in your sandbox, so you’ll want to look for a sandbox with a shorter refresh interval.
How much metadata and data are you looking to include?
The storage limit you’ll need from your sandbox depends on the size of your dataset. Salesforce sandboxes range in storage limits from 500MB to as large as your production org. Generally, Salesforce sandboxes with larger storage limits will have longer refresh intervals. So, teams tend to have a smaller sandbox with a short refresh interval for testing small and frequent deployments, alongside a larger sandbox that can contain all production data and metadata for testing larger releases.
Types of sandbox
Once you understand the different use cases and specifications of sandboxes, it’s time to move on to choosing the right sandbox types.
Developer sandbox
A Developer sandbox contains a copy of all of the metadata in your production org, with a storage limit of 500MB and a refresh interval of one day. This means, as the name suggests, it’s ideal for developing and testing your work.
Developer Pro sandbox
A Developer Pro sandbox differs from a Developer sandbox in providing a higher storage limit of 1GB, but still has the same daily refresh interval. So, teams tend to use a Developer Pro sandbox for the same development and testing work you might use a Developer sandbox for, as well as any larger QA testing tasks.
While both the Developer and the Developer Pro sandbox only copy the metadata from your production environment, Partial and Full Copy sandboxes also copy data.
Partial Copy sandbox
Partial Copy sandboxes are great testing environments for tasks like QA testing or user acceptance testing. They provide a copy of your metadata and your sample data within a sandbox template, and have a larger storage limit than either of the Developer sandboxes. Though Partial Copy sandboxes do come with a shorter refresh interval, this shouldn’t block your release process as QA and UAT only take place towards the end of a release.
Full Copy sandbox
The final type of sandbox supported by Salesforce is the Full Copy sandbox. These contain a complete and exact replica of all the data and metadata in your production org. There’s no storage limit for a Full Copy sandbox, so it can be a complete and accurate copy of your production org. However, Fully Copy sandboxes are limited by their 29-day refresh interval — if you want to copy a large amount of data you have to pay the price of not doing it very often. So while Full Copy sandboxes are ideal for tasks like load and performance testing, their long refresh interval makes them unsuitable for developing.
Sandbox seeding
With any type of sandbox, perhaps excepting a Full Copy sandbox, you need to think about sandbox seeding. This is the process of adding records to your sandbox so that admins and developers can work with the data before deploying — only Full Copy sandboxes contain a copy of all your data. This aids the testing process and reduces the chances of errors getting through to your production org.
Licensing
The sandbox licenses that are available to you will depend on which edition of Salesforce you’re using.
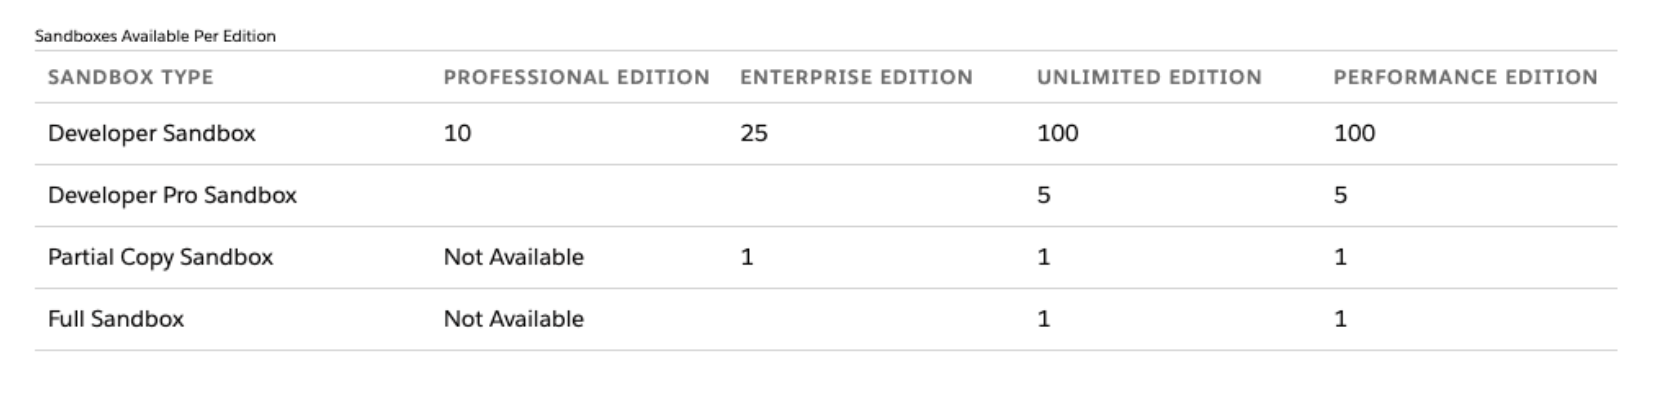
In addition to the sandboxes that are included with your edition of Salesforce, you can always contact Salesforce to buy more sandboxes. There are still restrictions: Partial Copy and Full sandboxes are only available to teams using Unlimited and Performance editions of Salesforce.
Make sure you periodically review your existing sandboxes to make sure you’re making the most of the sandboxes available to you. Salesforce will also routinely review and notify you of any sandboxes that have been inactive for more than 90 days – after 180 days of inactivity, these will expire and be automatically deleted.
This is a key difference between sandboxes and scratch orgs – though they’re often confused for each other. Scratch orgs are short-lived environments. Use scratch orgs as temporary copies of your production environment for more source-driven development or other specific and short-term tasks. Unlike sandboxes, scratch orgs expire after 30 days (at most) no matter what, rather than due to inactivity.
How to create a sandbox in Salesforce
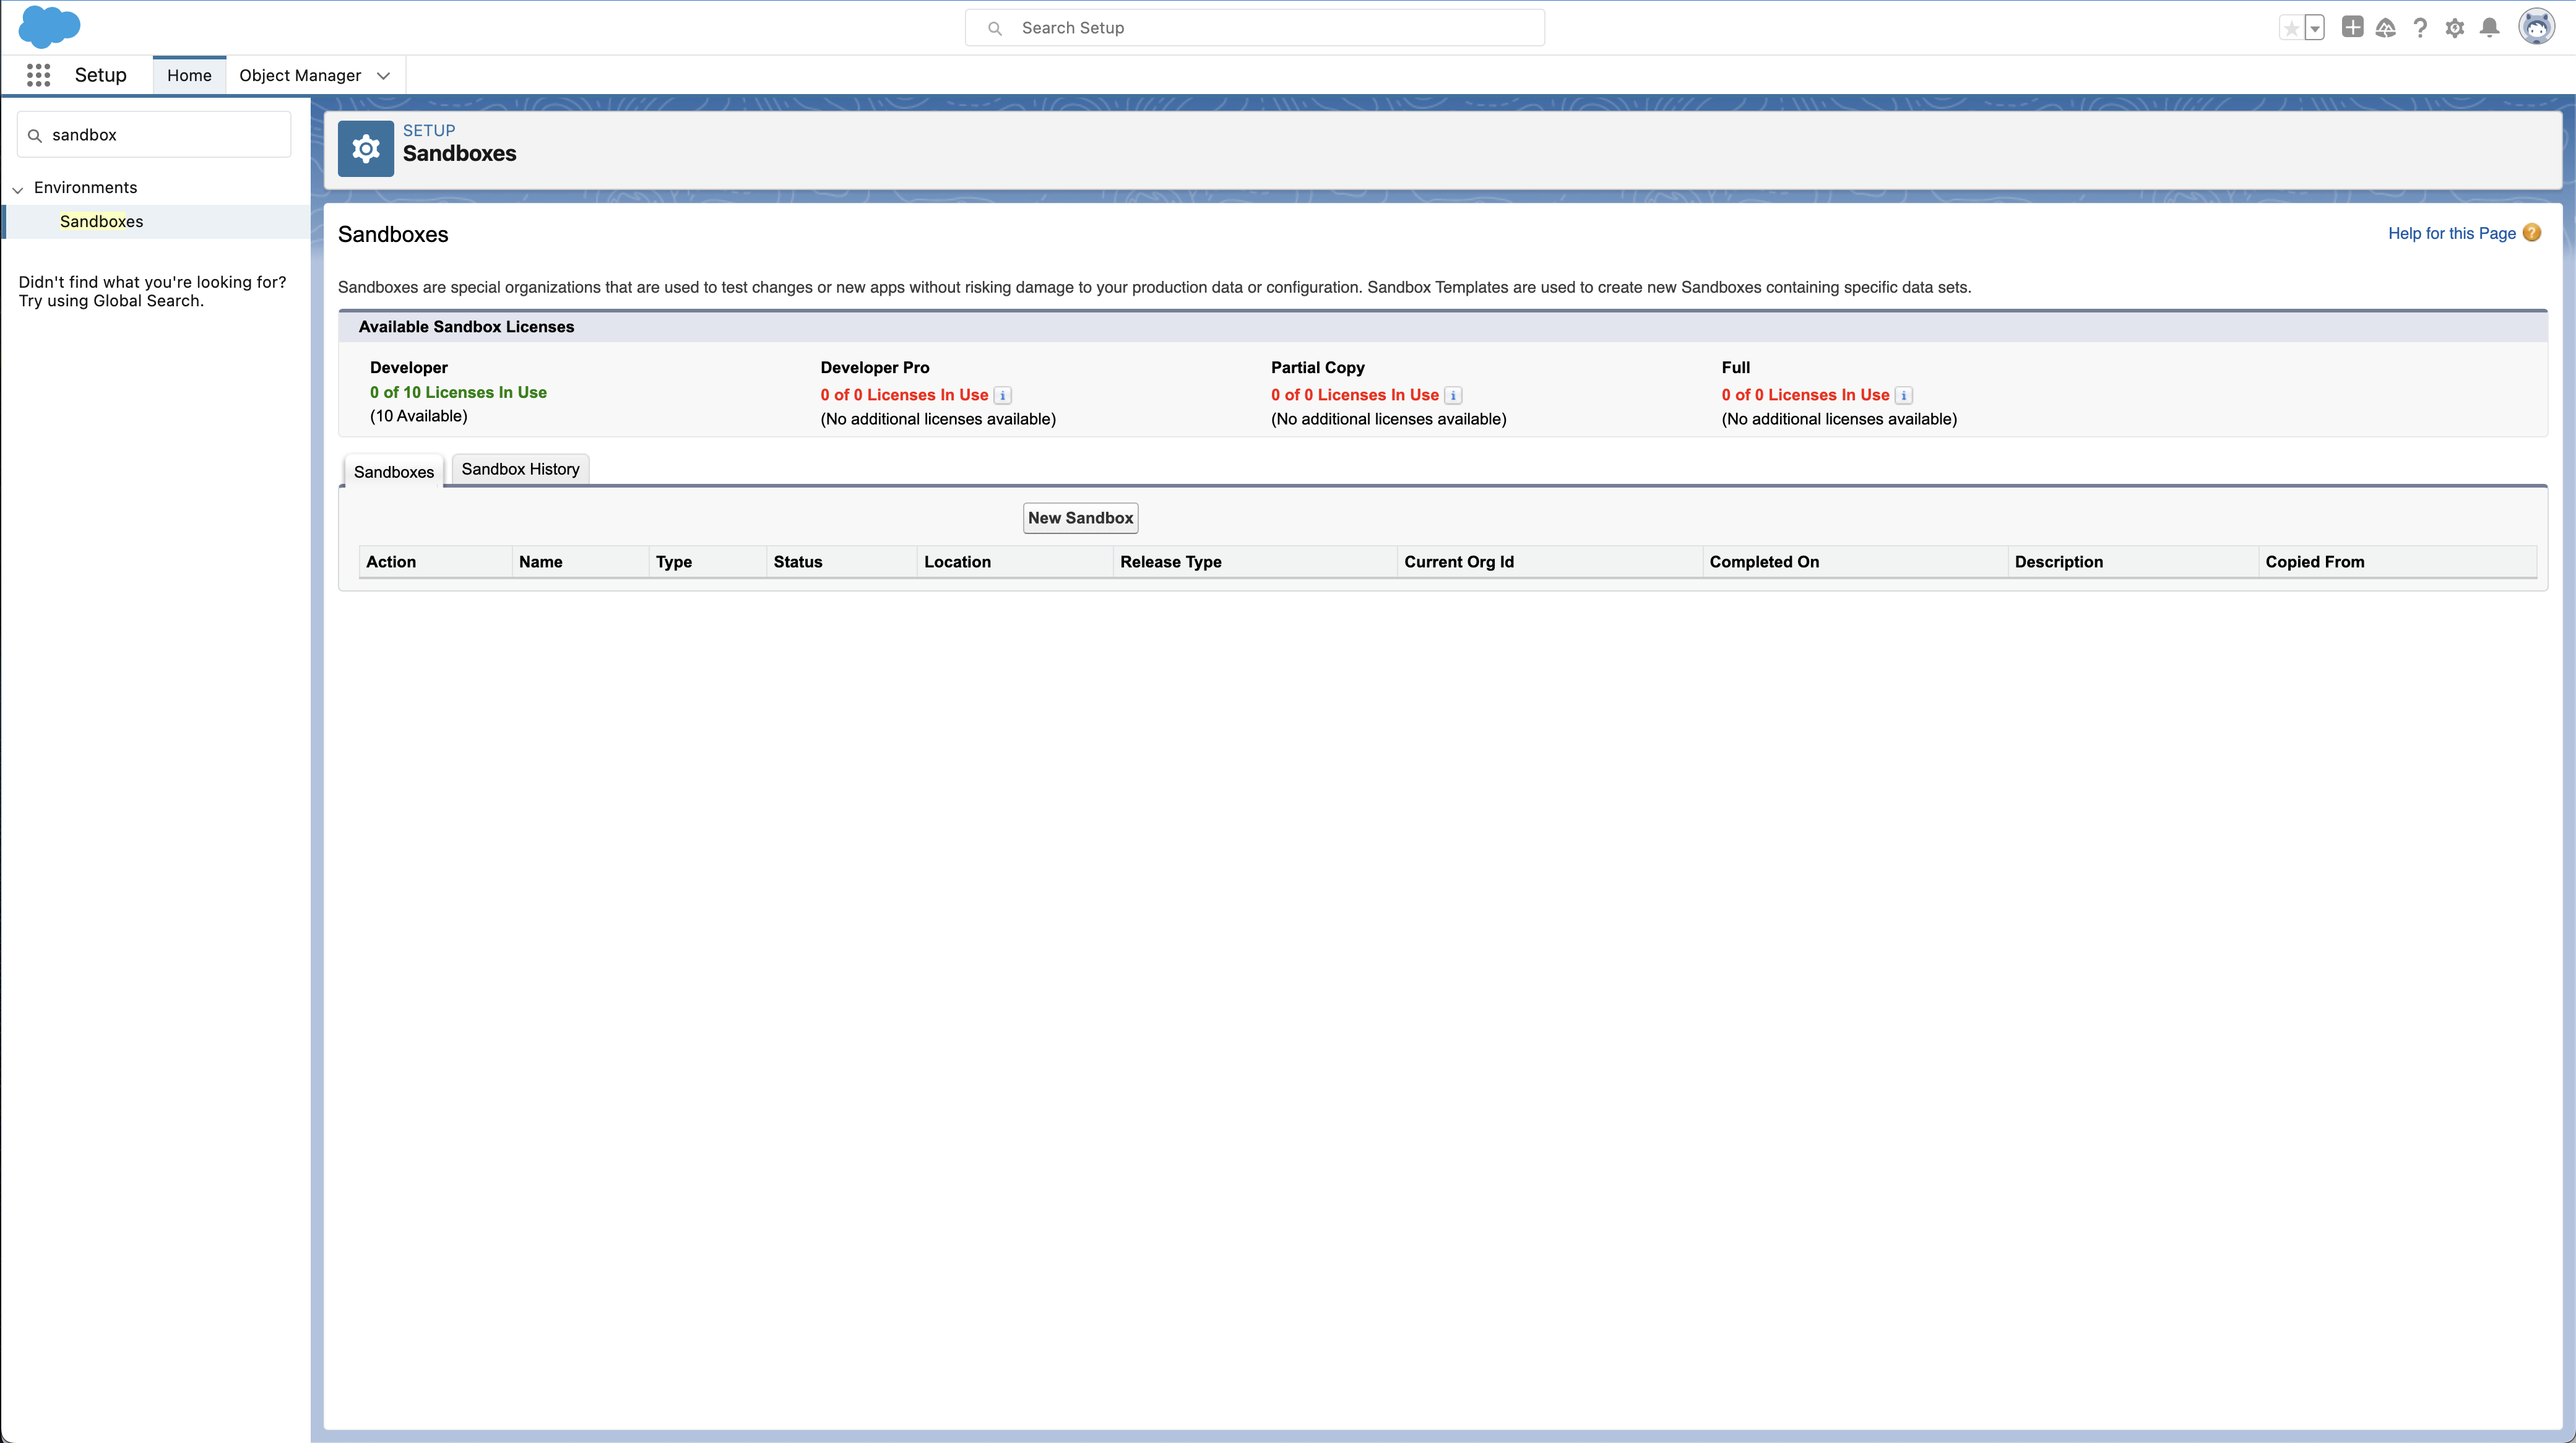
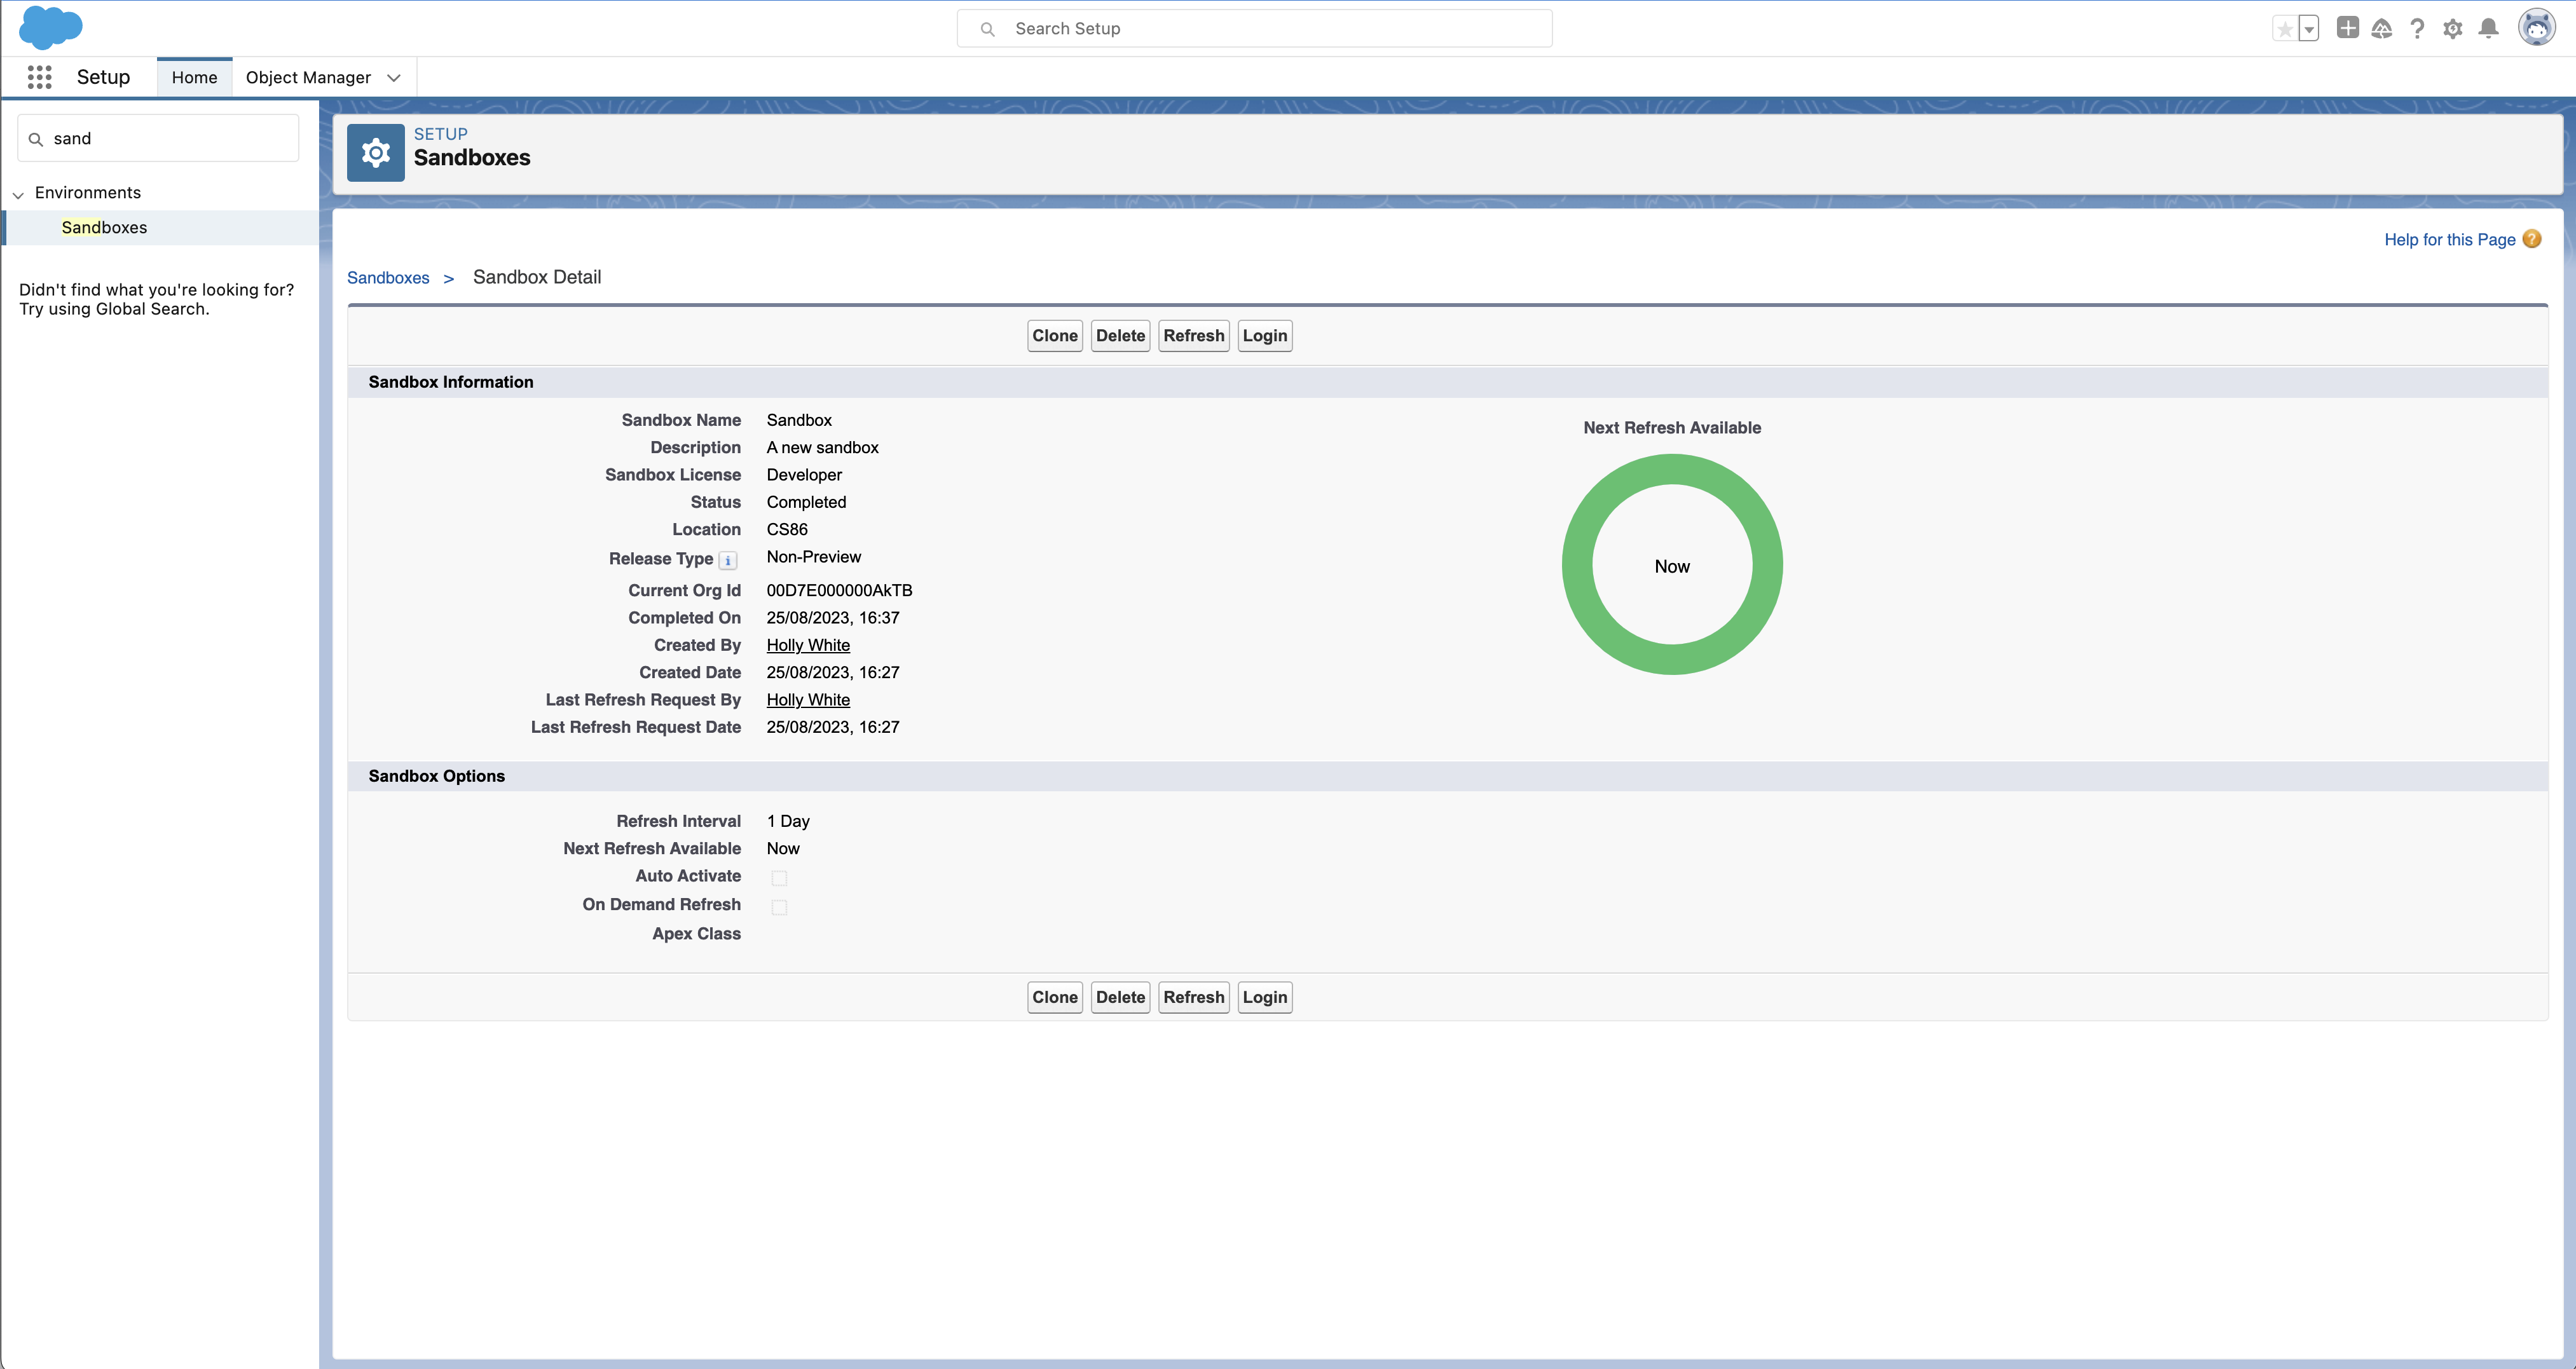
- Start by clicking on the Quick Find box in your Setup tab, type in and click on Sandboxes.
- Click on the button that says New Sandbox.
- Type in a name for your sandbox. Here we’ve named it “Sandbox” but you want to pick a name that explains why you’re using it but isn’t too long. Add a description — here we’ve used “A new sandbox” but it can be anything you want.
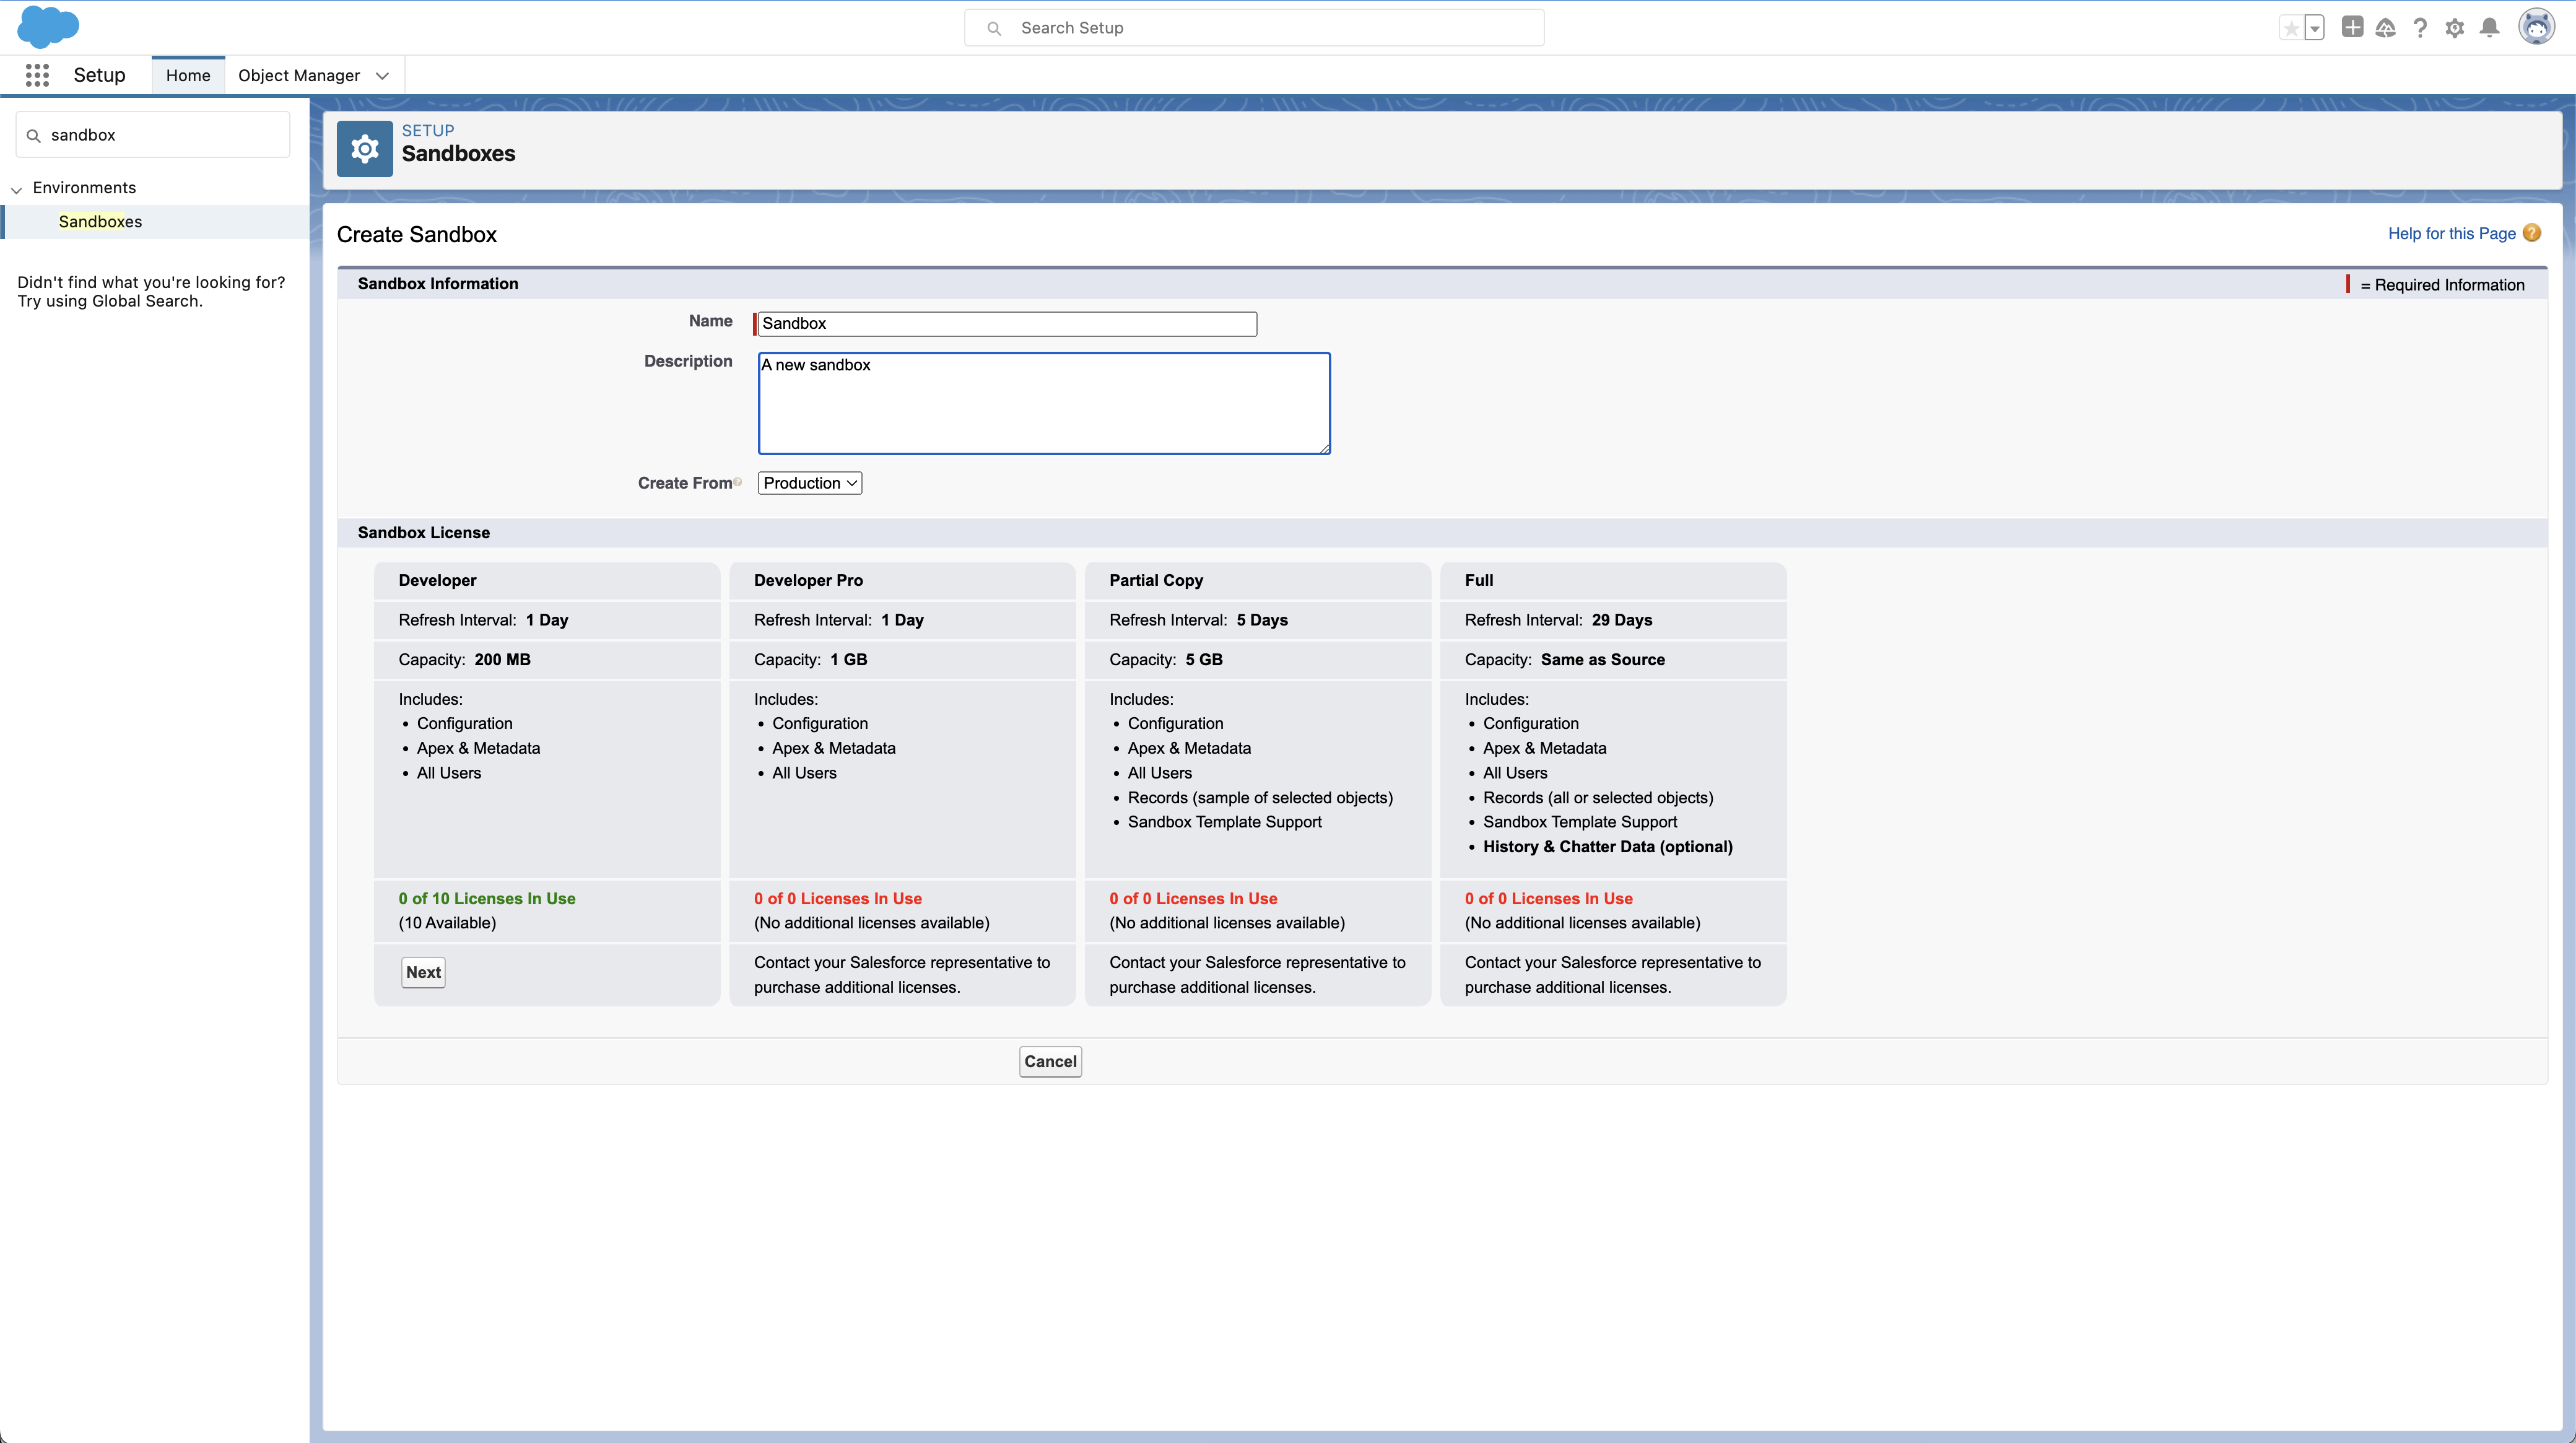
- Choose which type of sandbox you want to create. If you want to make a Partial Copy or Full sandbox then there are a few extra steps at this point.
For a Partial Copy sandbox, create a template to indicate what data you want to be copied into it. For a Full sandbox, you need to choose whether ‘chatter data’ will be copied across. Chatter data might include things like messages or feed messages relating to any social collaboration. It can be useful to include, but there’s often a lot of it and increasing the amount of data you’re copying across will make the process take longer.
Deploying changes from a development org to a sandbox
You can deploy changes from your development org to a sandbox using your usual metadata deployment workflow. However, there are some additional steps you’ll need to take to ensure your tests run as usual.
Whereas all test classes are automatically executed during a deployment to production, this is not the case when deploying to a sandbox. This means that you could deploy development work to your sandbox, complete all your QA and UAT in the sandbox, and only discover that other automated tests fail when you do your final deployment to production.
This can be easily solved by manually hitting the Run all Tests button on the Classes page when you deploy from your development org into a sandbox. All your unit tests will then be run for this deployment into your sandbox.
How to deploy your changes from a sandbox to production
Once you’ve tested your changes in your sandbox, it’s time to deploy them to your production environment so that your changes can be released. There are various tooling options for deployments.
Change sets
Change sets is Salesforce’s native deployment tool, but using it can be extremely slow and painful. To deploy, create an outbound change set and send it to your production org using a deployment connection. You can also use change sets to deploy from one sandbox to another if they were both created from the same org. Remember that any completed deployments can’t be rolled back, you can’t deploy deletions, and if you experience an error then you have to go all the way back to your sandbox to try and solve it.
ANT migration tool
Another way of deploying your changes from a sandbox to your production environment is by using Salesforce’s Ant Migration Tool (you may know it as the Force.com migration tool). This tool can be used to deploy file-based metadata changes from a developer sandbox. Ant provides slightly more flexibility than change sets — it’s possible to integrate Ant with Git and other source control systems as well as with automation tools to streamline the deployment process. That being said, it is still a largely manual process which provides room for human error and suboptimal visibility.
Salesforce DX and VS code
Salesforce DX (“developer experience”) includes more options for deployments. The Salesforce CLI has commands for pushing and pulling metadata between orgs. Visual Studio Code has become the code editor of choice for Salesforce developers, and you can configure it so that all saved changes are automatically deployed to a Salesforce org.
Metadata API
You can move metadata between your orgs with Salesforce’s Metadata API, using its retrieve() and deploy() calls. The API doesn’t support every metadata type in Salesforce, and you can deploy a maximum of 10,000 files or 400 MB at a time. But the Metadata API makes it possible to build deployment tooling. Third-party Salesforce DevOps solutions use the Metadata API.
Gearset
There are a handful of third-party solutions which can handle Salesforce deployments. Gearset — the organization behind DevOps Launchpad — is one of them, and it’s easy to deploy to and from sandboxes within the app. To start, click on the compare and deploy tab of your screen and select your sandbox org as your source and your production org as your target.
Being able to directly compare the orgs side-by-side in Gearset gives you full visibility of the changes you’re making, so any unexpected or unintended changes are easy to spot. You have the option to either create your own comparison filter, or to select a pre-existing one — creating your own filter can make the process faster so that you aren’t comparing metadata that isn’t involved in your deployment.
Gearset’s intuitive UI separates your changes into “new”, “changed”, and “deleted” to make comparisons easier. Just choose the metadata you want to deploy, and let Gearset’s problem analyzers error-check your deployment. All that’s left to do is name your deployment, update any tracking tickets, and deploy away! You can even schedule your deployment for later — some users take advantage of this feature and schedule their deployments for a release window. The average team using Gearset has a 97% deployment success rate — why not try it out for yourself with a 30-day free trial?
Next steps
Sandboxes are super useful testing environments, so you can experiment and test your changes before you move them to your production org. This approach — and not making changes right in production — is a vital starting point towards a DevOps strategy.
If you’d like to find out more about how DevOps can improve your Salesforce release process, you’re in the right place! DevOps Launchpad has plenty of courses and resources that will help you get started with Salesforce DevOps — start your learning journey with us today!